As I write this month’s newsletter I find myself moaning about another windy day with the prospect of more windy days going forward. I did get out for a morning’s flying last Sunday though (6th March) which turned out to be a bit of a cold, wet and breezy morning.
Taking the above into context though I do feel lucky and fortunate though in comparison to what is happening in Ukraine right now, the scenes on the news are terrible.
Articles For The Newsletter
I have received a couple of articles for inclusion in the newsletters going forward. I am grateful for these
Could I ask if you are going to send me articles could you please use Microsoft word (.doc .docx), .txt files or email me the words and photos. Please avoid .pdf files as I cannot easily format paragraphs for the newsletter
Not a View From The Edge
Now then I have some breaking news (no pun intended Will), our resident feathered hedge reporter has fallen off his twig and broken his ankle. Such was the seriousness of the fall from the twig that the RSPCB ambulance had to rescue Will and take him to an animal hospital for some very small screws to be inserted into his ankle, these were so small that Rolex had to provide them. The reason for the fall has not be determined but it is spring the time when birds tend to start feathering their new nests and trying to attract Mrs Will Sparrows.
Another thing to consider is that this time of the year birds are hitting the suet pellets, meal worms and sunflower seeds pretty hard, has the twig given way under over indulgence??
I have been to visit Will and took him a lemon drizzle cake to keep him going. He was happily snuggled in his bird box although a little subdued.
Watch this space as he is eager to get back in the hedge although it will be a few weeks yet.
Trainers
Below is the list of current trainers for the club. Get to know these people if you are learning to fly. Ask them for their phone numbers so that you can ring them to check availability. This save’s wasted journeys which can lead to frustration for trainees.
Jason Reid, Mark Conlin, John Higgins, Brian Holdsworth, Chris Vernon, Andy Harrison, Jim Sheldon, Paul Cusworth, Justin Goldstone and Kevin Watson.
The vast majority of these trainers are in employment so their availability is governed by their work. Please bear this in mind when arranging a flying session.
Don’t forget the main training session during the summer is Wednesday nights, weather dependant of course.
So here we have this month’s feature article very kindly provided by Andy Moore, the article centres around his experience of getting started with 3D printing which is becoming ever popular in our hobby.
After several years of pestering Jake & Jason to print various 3D parts for me, I finally decided to take the plunge and buy a cheaper end (but still good) 3D printer.
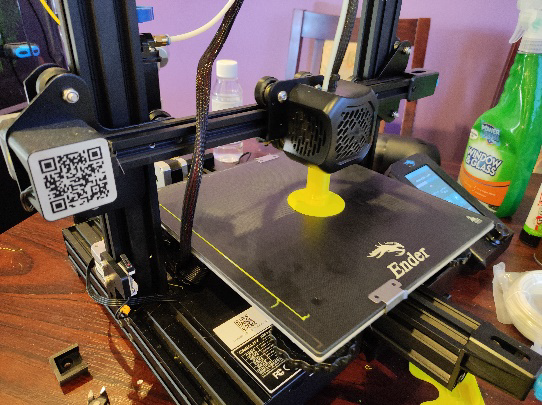
Having done my homework, the printer of choice seemed to be the Creality Ender 3 V2 (the slightly older Ender 3 is also fine but doesn’t have the 32-bit mainboard). After buying it before Christmas, it got put aside for a couple of months until finally, after watching a few build videos, I decided to put the thing together. Taking it nice and easy, the thing was put together in around 2-3hrs which seemed about right. I wasn’t particularly hard to do but it wasn’t easy either – I don’t think it could have been done with the instructions only, definitely needed to watch a few You Tube videos in advance & during the build.
When it was completed, I seemed to spend the first week doing various test prints – many of which failed leaving you with at best a ball of spaghetti and at worst nothing. From what I could work out, these 3D printer things are pretty straightforward having not that many parts – Filament, Extruder & hot end with stepper motors along the way. The easiest way to understand how these things work is to think of them like a hot glue gun – the glue is the filament, the trigger mechanism is the extruder and the tip is the hot end. Mine is quite basic and simply feeds the filament from a roll, into the extruder, through a Bowden tube into the Hot End (which encapsulates a thermal break & thermistor to monitor the temp of the hot end) – the hot end encapsulating at least one fan.

Now, when you have your printer setup, you need to print something. You have a couple of choices here – you either design it yourself using something like Fusion360 (steep learning curve) or you download something that someone has taken the time and effort to design/refine – the best place to do this is Thingiverse, a very large repository of 3D designs. After the download you will have a .stl file. Unfortunately, 3D printers don’t understand .stl files so you have to open the .stl file in a SLICER programme and create a GCODE file which they do understand. A Slicer programme seems to basically tell the printer how to print the item – what temp to use, thickness of walls, how fast to print etc etc. One of the more popular Slicer programme and the one I use on a daily basis is Ultimaker Cura (known as simply Cura). Cura can easily be described as one of the Dark Arts in itself, whilst it’s not too bad to get your head around, it’s worth watching a few more videos to really get to grips with it and get the best out of it. When you have Sliced your .stl file its time to save it on your Micro SD card & put it in the printer & boot the printer up.
When I was first using this printer, consistency of print seemed to be its main problem in that sometimes the print wouldn’t stick to the glass bed, sometimes nothing came out of the nozzle etc etc. Back to the drawing board & You Tube to find out why. Turns out that many people using the Ender 3 V2 were having similar problems and 9 times out of 10 it was all down to not having a level bed caused by a very cheap/weak bed springs that you adjust to alter the height of the print bed. Until I changed my springs, I found myself having to level the bed after almost each print to get good results. Having changed the springs a week ago, I found that I haven’t had to level the bed for over a week despite printing almost 24/7 !

The strange thing about these printers is that, because they are so popular & well-liked, there are loads of upgrades available for them on Thingiverse so they can be used to upgrade themselves and a large number of support forums incase you get in trouble. I’m presently going through a series of upgrades to mine to make it a much nicer & reliable machine (not that it isn’t already). These include:- Auto levelling sensor (Creality CR-Touch or BL-Touch), all metal Extruder (no plastic bits), Capricorn Bowden PTFE tube (better tolerances & higher temps), Micro Swiss Hot End (just better), PEI Magnetic flexible bed & 3D printed Hot End fan enclosure & spool holder (with proper bearings). I could even go down the route of buying a Direct Drive extruder (which doesn’t use a Bowden tube and sits on top of the hot end) but this would probably be one step too far and not really needed.
Maybe I should have bought a better machine like the Creality Ender 3 S1 or S1 Pro ? Maybe, but it’s taken time to research all the best bits and at least I can choose the upgrade parts that I know will work as these things have been out for a while. Also, most of the upgrade parts are not that expensive but do seem to work quite well.
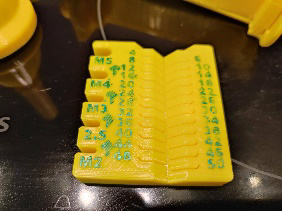
It’s amazing just what you can find on Thingiverse to print – everything from Vases to useful tools and Mandalorian models. I’ve taken photos of some of the various bits and pieces I’ve printed recently to give you an idea of what you can do. I’m purposely leaving the yellow PLA filament on to test and use it up.
If you are in the market for a good, reasonably priced 3D printer, I hope you found this article useful.
Reminder of up and coming events this summer:
Egg Drop and Fun Fly Sat 16th April
Easter extravaganza, bring your funkiest looking planes and have some fun! Strap a cup to your plane and drop an egg (water bomb). Other fun events will be organised on the day. Prize for the funkiest looking plane! Whole family welcome.
Electric Fly In T(TBD)
All things electric, gliders, EDF jets or foamy’s all welcome! Open to all clubs with BMFA membership.
Refreshments available on the day.
Jet Day Sat 11th June
Let’s burn some kero! Get you jets out be it turbine or EDF, open to all clubs with BMFA membership and B cert needed to fly turbine jets. Refreshments available on the day.
BMFA North Western Scale Event Sun 10th July
A BMFA organised scale event. All club members welcome to enter.
Refreshments available on the day. Gate opens at 9AM flying from 10AM.
Annual Club Fly- In Sat 23rd July
Our annual club fly in, open to all clubs with BMFA membership, a day to relax and enjoy flying. The whole family welcome to come, refreshments available on the day along with a raffle.
Aero Show Trophy Sat 17th September
Our annual club aero show competition. Fly a simple scale schedule.
Stay Safe
Chris V